
Everyone wants to live the American dream. Who doesn’t want a huge house with an expansive yard for the kids and pets to run around in? Wayne Martin already had these things but decided to start a project that will truly set it apart from the others. He began to dig! The others thought he had gone crazy but found out that his plan was a great one. Wait until you hear what he did with the hole. Talk about ambitious!
Not The Norm
When you hear about someone digging a hole that huge, you might assume it is for a swimming pool. That in itself would be enough to make the neighbors jealous! Wayne, however, decided to fill this hole with something else.

Not The Norm
Buying A Container
After he laid down the gravel, he added something that did not go in a pool. Right away, his neighbors noticed that he brought a shipping container to his property. But what was it for? Before he began to dig the hole, he decided to buy a 20-foot container.

Buying A Container
Shutting It Tight
You would not believe how many of them you can get on the internet on a budget. Many DIY enthusiasts know that it is important to keep the costs low. It is easy to go over the budget if you are not careful.

Shutting It Tight
Thinking In Advance
Wayne managed to find a container to his liking while staying within the budget. However, what did he plan to do with it? The first thing he did was to make sure that it sealed shut. Wayne did not use the huge double doors but made sure to close it shut and put in a swinging door on the other side.

Thinking In Advance
With Pea Gravel
He ensured that nothing could go in or out. He also made sure that this door would swing inward and served as a one-way entrance. The biggest error he could have made was to make a hole too small for the container.

With Pea Gravel
A Professional Touch
He checked that the hole would be at least two feet deeper than its height. He gave it an allowance of two feet on all sides where it would be placed and more room around where it would swing out.

A Professional Touch
Like A Glove
Good thinking! He did not forget to line the bottom with pea gravel either. This was very important since he needed something soft to put the container on that would still let him filter through the soil.

Like A Glove
A Sump Pump
By this point, it is not hard to guess what he had in mind for this hole and the container. Read on to see what his goal was. While it was meant to be a DIY project, it still needed the touch of a professional.

A Sump Pump
How To Get In
After all, it is not like one just has a 20-foot container that they can lower into a huge hole. This was the reason Wayne hired a septic tank company. It was a way better idea than getting his friends together and doing it haphazardly.

How To Get In
The Support Beams
The container was finally in the hole. What would come next after this? There were lots of reasons to make the hole larger than the container was. He did not leave only wiggle room there. He left around two feet on either side and a few more for the door.

The Support Beams
Making The Roof
The container was now in the hole, which meant it was time to get serious. Trust us, you will be inspired by the end result! A sump pump is used by plumbers to drain water out of an enclosed space.

Making The Roof
The Underground Roof
It is an important piece of equipment when you need to put something below the ground. It lets you keep the bunker above the water, which is why it is commonly found in basement projects. Who wants an underground bunker to flood, right?

The Underground Roof
A Different Staircase
We will soon find out exactly what Wayne had in mind for the bunker. When you fashion an underground bunker, it is crucial to put an entrance to it. Wayne decided to put down concrete steps that would ensure that the top stair and the top of the bunker were at the same level.

A Different Staircase
The Concrete Blocks
Most people want a simple staircase like a fire pole or a ladder. With his bunker down there and the stairway ready, Wayne could now finish the exterior and begin to work on the inside. Wayne knew well enough to put two l-beams to make the bunker as stable as possible.
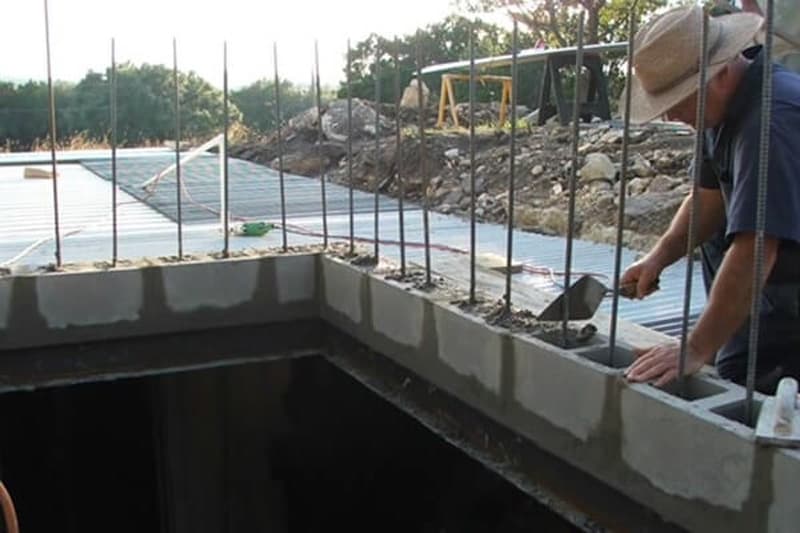
The Concrete Blocks
Pumping It In
You might not think that a 20-foot container can move a lot, but the ground can shift and leave it unbalanced. The two beams served one more purpose. They did not only provide support but also served as a frame for his other plans.

Pumping It In
Pouring The Concrete
What did he have in mind anyway? We sure hope that you are ready to find out. When you are installing a bunker like this one, you must ensure the stability of the roof as well. He added a lot of framework above to support the room.

Pouring The Concrete
Securing The Bunker
This was the reason he added the l-beams. It also goes to show what else he had in mind for the bunker. We are sure that he dug the hole digger than necessary to ensure that it blended in perfectly with the yard.

Securing The Bunker
Block After Block
It sounds like an oxymoron to work on an underground roof, but that was what Wayne did. He put down heavy metal sheets across the framework, ones stable enough to support the weight of a person.

Block After Block
Temporary Support Beams
This was only the first few steps to finishing the roof. However, it also gives us an idea of what they had in mind. The exterior was already taking shape, but what was his plan for the inside of the bunker?

Temporary Support Beams
Filling It In
We have already talked about how the staircase would serve as the only entrance and exit there. Wayne was not happy with a normal entranceway, however. After setting up and securing the roof, he worked on the grand entrance to the bunker.

Filling It In
Alcohol Stash
He left the opening from the roof and laid down rebar to ensure that it was all supported. We daresay that it was a very underrated part of the project. Clearly, safety was a top priority for Wayne as he put together the bunker.

Alcohol Stash
More Than That
He did not only ensure that it was safe and secure but made sure that it all followed the code. He made it with longevity in mind and wanted it to act as a bomb shelter if it came to that. But what made his underground bunker so special?

More Than That
Available To All
While it was important for him to add a sump pump there, the most important part had been the air vents. There is no way you can last long down there without fresh air, so he added two 12-inch vents at the front and back.

Available To All
Sharing Some Tips
Clearly, he added this because it might be necessary to spend a long time there. Did you think that he already had everything in check? However, Wayne did not take any chances. The ground can shift and move, especially during the winter.

Sharing Some Tips
Not The Only One
He made sure to pour concrete in the bunker along the sides and on top of the roof. Talk about a perfect pour! Everything seems smooth and nice, so it should be able to perfectly fit in with the yard.

Not The Only One
Business Is Booming
Trust us, you will agree that it is all worth it in the end. You are wrong to think that he just added a thin concrete layer over the bunker. He made sure to add six inches on top of it! He just wanted to keep the place safe, secure, and strong.

Business Is Booming
The Cost
No rain, snow, or sleet can penetrate it! Now that he was confident it would survive anything, it was time to work on its interior. After the concrete finished drying, he returned the basics and added cinder blocks through the rebar to the entrance.

The Cost
Getting Ready
He wanted the entryway to be protected and stand out at the same time. It was the only portion that would need to handle the elements, so it was a good idea to protect it. The door would be subjected to a lot over the years, so it must handle animals or terrible weather.

Getting Ready
In South Dakota
Let us take a look inside! For projects like this one, safety is very important. It does not make sense to cut corners when it comes to this aspect. Shortcuts will end up costing you more in the long run.

In South Dakota
Other Options
When the concrete was stable and dried, Wayne could remove the beams that held up the roof. The cinder blocks might look like they were only for show, but they provided the foundation for this bunker.

Other Options
High-End Soil
No one wants their bunker to sit out in the middle of the yard in a dirt pit, so he made sure to use high-end soil to fill out the space around the entrance. It means he can return once everything is finished and add plants to help it fit with the lawn.

High End Soil
The Finished Product
With the way the finished product looks, you would not have thought that there was ever a huge hole there. No one would imagine that a bunker was there either! We do not know what we were expecting, but we did not think this cellar was going to be full of wine.

The Finished Product
Underground
It really does make a lot of sense. Liquor is best stored below the ground since the cool atmosphere would help preserve it for a long time. However, could this be the only reason he worked on the project?

Underground
Multi-Use
The good thing about this container is that it can fit a lot of different needs. You can see that there is a lot of storage room, so it is a good place to keep your holiday décor or non-perishable food items.

Multi Use
Natural Disaster
This is on top of the fact that you can store your wine here, of course. In case a natural disaster occurs, Wayne has a shelter where he can stay for hours or even days on end. He can keep a regular yard on top of this!

Natural Disaster
Anyone Can Do It
An interesting part of the project is that with money and resources, you can also do this. Instead of making a secret bunker, Wayne shared his project with everyone. He shared the specs of the container, sharing tips and noting what builders have to pay attention to if they wanted to do the same thing.

Anyone Can Do It
Sharing Advice
While he was done with the bunker, he shared a few tips and recommendations for those who want to do it. One suggestion was to add handrails to the stairs. This is a great idea if you are from somewhere cold where it is common for stairs to get slippery and icy.

Sharing Advice
Overhang
He also recommended building an overhang over the entrance in case the stairs get icy or filled with rainwater. This would also keep critters away! There might be no wars on American soil, but a lot of people have created bunkers on their properties. The federal government told people to make fallout bunkers and shelters back in the Cold War. They advised citizens to use a lot of concrete and build a strong roof. Back in the ‘60s, the shelters were not designed well, but people now have access to many resources.

Overhang
Getting Ready
Do many homes still come with them? In early 2017, bunker and container building companies boomed. Americans felt compelled to get ready for war with all the foreign relations uncertainty and tension.

Getting Ready
Peak
Rising Bunkers owner Clyde Scott runs his business out of Texas and said that his company peaked from 2016 to 2017. Independent said his sales have gone up by 400 percent and even grew to become a business that makes $10 million a year.

Peak
Hard Work
In the end, his hard work paid off. The cost was more reasonable than you had in might. He only ended up spending $12,500 on the DIY bunker! He said that he worked on it mostly by himself and had his own tractor.

Hard Work
Creating Your Own
It probably helped with pouring in the soil and digging the hole. It is definitely a resourceful way to create your very own bunker. Of course, you can also turn to bunker companies instead! Paul Seyfried, the President and CEO of Utah Shelter Systems, says that the business had been busy recently.

Creating Your Own
The Cost
He has customers across the country but said that the bulk of them come from Texas, New York, and California. “The smallest shelters start at around $50,000. The largest shelters we build, a 12 [foot] by 50 [foot] usually runs right around $100,000,” he told Fox13. A lot of customers do this for their families and their own fear of electromagnetic radiation and pulses. In South Dakota, there is a decommissioned army base called Vivos xPoint.

The Cost
New Bunkers
It has not been in use since 1967, although there are now plans to use the bunkers for the citizens. There are 575 concrete bunkers “off-the-grid” in the grasslands close to the Wyoming border. They are hoping to build more! The bunkers are available for lease at $25,000 for 99 years on top of an annual fee of $1,000. They are quite roomy at 1,590 or 2,120 square feet. Keep in mind that there is no air filtration, electricity, or plumbing.

New Bunkers
Shelters
The California-based business Atlas Survival Shelters claims that it sold 30 shelters in only three days after Donald Trump assumed office. In 2011, they only sold 10 in one year! Clearly, there is a higher demand these days. The bunkers were made to come with creature comforts. We can understand if you do not want a shelter that looks like an unfinished basement, so this is going to be a good choice. Many customers are baby boomers who still recall the threat of missile or nuclear attack of the past.

Shelters